Welcome to my guide for phase 1 of the No Man’s Sky Voyager Expedition. The Voyager Expedition has been live for a couple of days now and with this guide I’ll show you how to get through the eight milestones of phase 1.
No Man’s Sky Expeditions are great fun and reward you with some really cool cosmetics. If you’ve just recently gotten into No Man’s Sky because you heard it was now amazing on PS VR2 then this might be your first expedition. The Voyager expedition won’t be too tough as it isn’t permadeath so you can die as much as you want and you won’t lose your inventory – as long as you make it back to your grave to collect your stuff.
To start the expedition you’ll need to create a new game from the save menu and then select Community Expedition from the next screen.
General Tips
When you are on a planet, always scan as many things as possible. Scanning minerals, fauna and flora on a planet will get you some valuable units. You can’t transfer units over to your normal save after the expedition but if you are continuing your expedition save as your mains ave then they will come in very handy. Units are also handy to have for buying items to make parts of the expedition a bit easier.
Remember to always be mining resources when you are on a planet as well. When you are off exploring make sure to mine rocks for Ferrite Dust, plants and trees for Carbon and keep an eye out for Cargo drops. You should also keep an eye out for Red oxygen-rich plants. Oxygen is a valuable resource used to recharge your life support and it is used to craft many items. You can also get Oxygen from mining (destroying) hazardous plants.
You should also get to a space station after you have completed the first milestone. When you land at the station head up to the platform on the left and get yourself a free Exosuit upgrade. This will increase your Exosuit storage slots.
On completing certain milestones you will receive upgrades for your exosuit and starship. Make sure to install these right away as they can be very useful.

While you are in the Space Station, remember to sell any unwanted items at the trade terminal. You can sell things like Rusted Metal, Goop and anything else you might not need to get you some units. You can also buy resources like Ferrite Dust and Chromatic Metal from Trade Terminals.
No Man’s Sky Voyager Expedition Phase 1 Guide
Now let’s get on with the guide for phase 1 of the Voyager Expedition. The guide lists the 8 milestones you have to complete during phase 1 and how to complete them.
Planetside
Rewards: Creature Pellets x 50, Powerful Mining Beam Upgrade, Hyperdrive Plans
The first milestone of phase 1 is called Planetside and to complete it all you have to do is land on a planet. When you start the expedition you should be on the bridge of your fighter. Head to one of the teleporters and this will take you to the ship’s docking bay. Head to your ship enter it and then leave the freighter.
Head to the planet that is nearest you. You can activate your ship’s pulse drive to fly faster by pressing L1 + R1. When you get near the planet’s surface you can slow down by pressing L2 and then land by pressing Square. Try and land near a lot of resources such as trees, plants, etc. If you spot any user-created bases you can also land near these as they often contain useful resources. Once you exit your ship the milestone will be complete. Head into the menu, go to the Expedition tab and collect your reward for this milestone.
Interstellar
Rewards: Base Computer Plans, Pre-Packaged teleport Reciever Unit
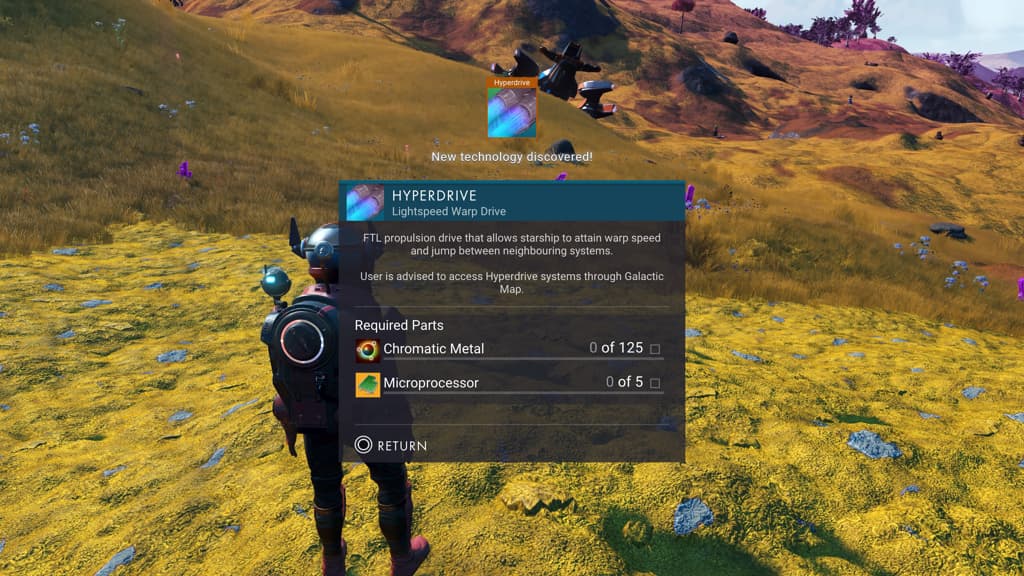
The next milestone is called Interstellar and it requires you to leave the current system you are in and warp to a new one. Before you can do that you’ll need to install the hyperdrive on your ship. To do this you are going to need the following resources:
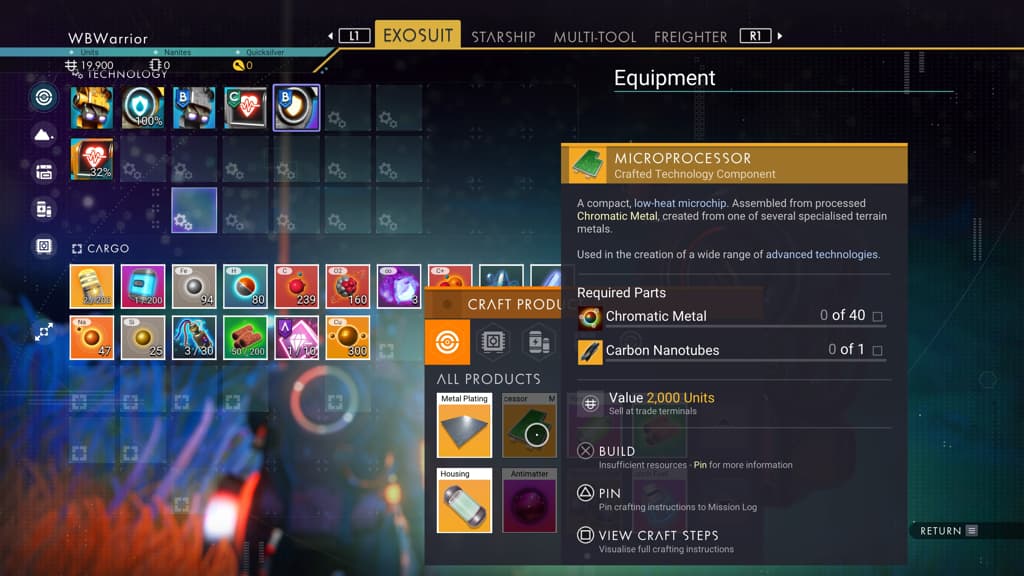
- 325 x Chromatic Metal (125 to install the hyperdrive and 200 to create 5 x Microprocessors. To get 325 Chromatic Metal you will need to mine 650 copper)
- 250 x Carbon (to create 5 x Carbon Nanotubes, also needed to build the Microprocessors)
You will also need to construct a Portable Refiner to refine Copper into Chromatic Metal. To build the portable refiner you will also need.
- 50 x Ferrite Dust (to craft 1 x Metal Plating)
- 30 x Oxygen
To find copper to refine into Chromatic Metal, use your scanner (L3) then look in your visor to look for Copper Deposits as shown in the screenshot below.
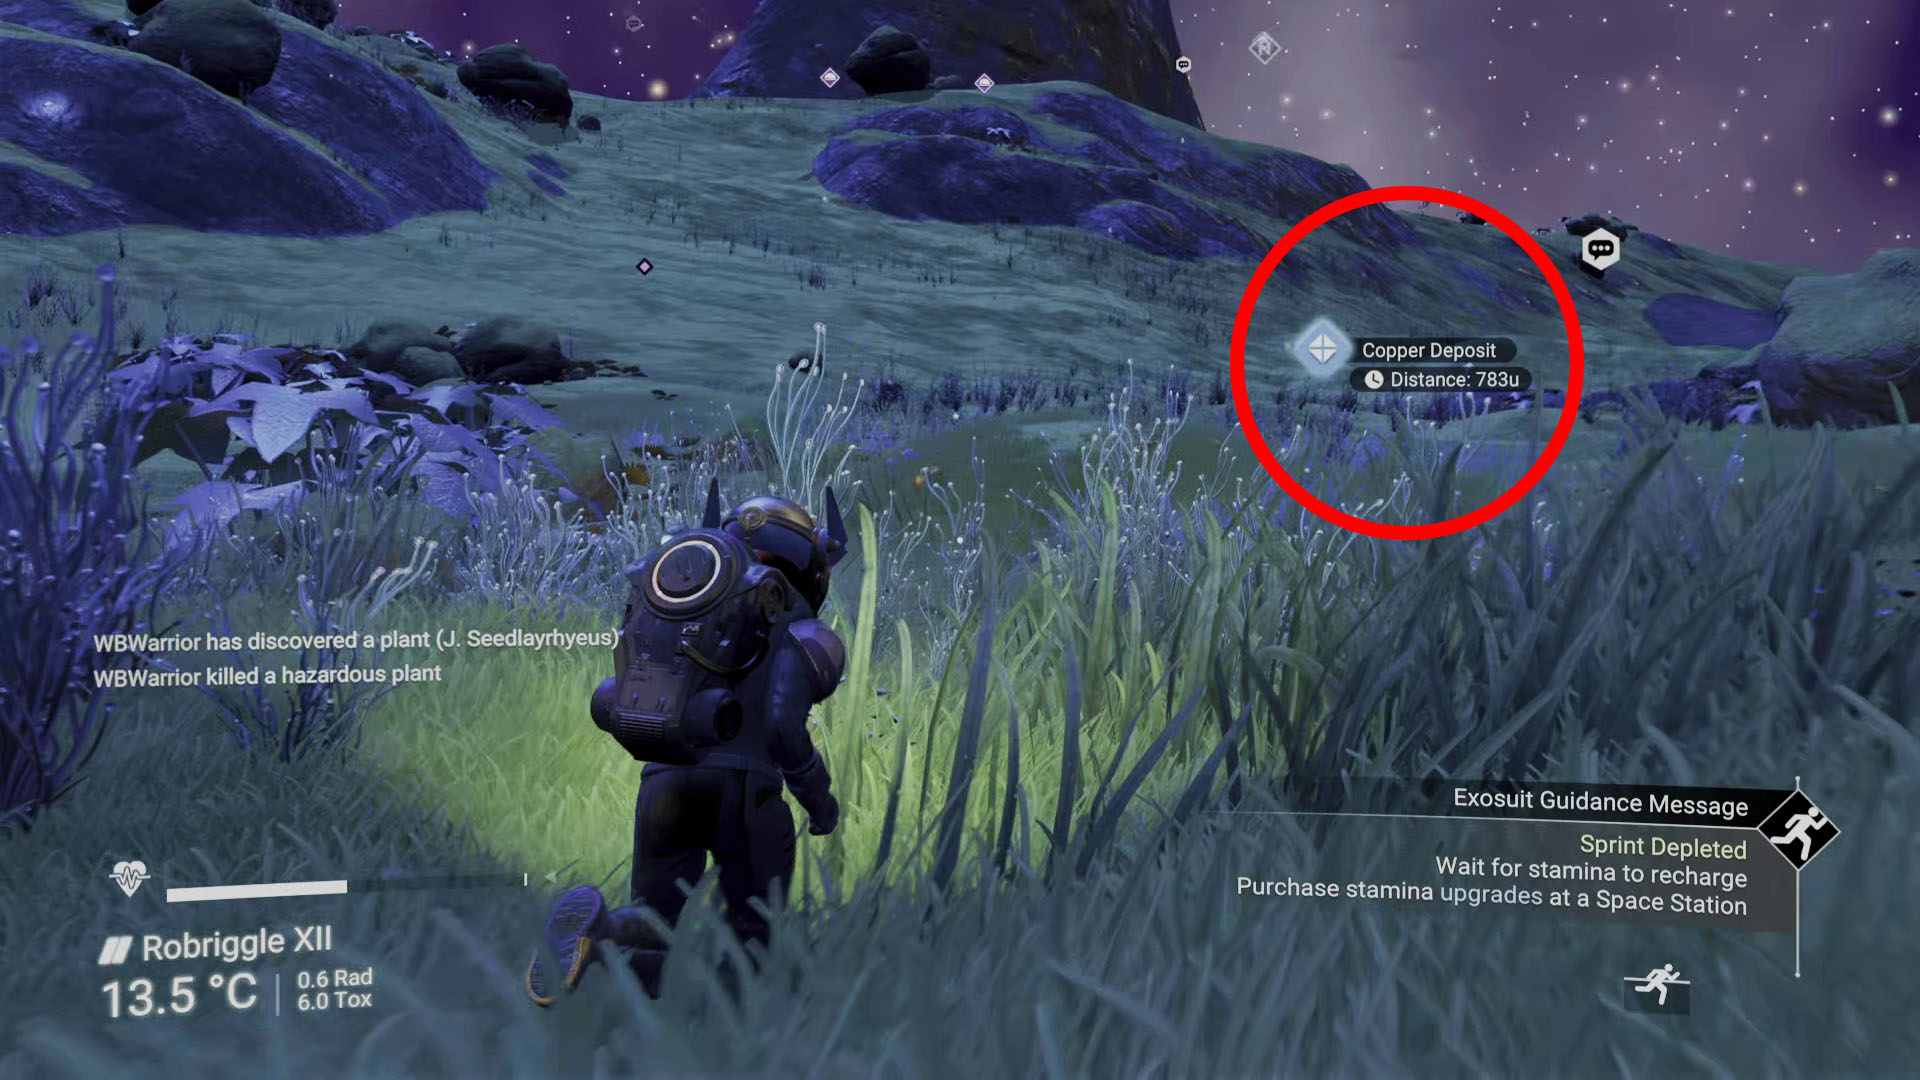
Once you reach the copper deposit, switch to your terrain manipulator tool by pressing Triangle. If you press L1 while the train manipulator is selected it will make the beam radius smaller. This takes longer to mine the resource, but you’ll get a lot more of the resource from the deposit.
Mine as much copper as you can. If you can’t get enough from the resource deposit then you will need to go exploring for more deposits. If for some reason the planet you are on doesn’t;t contain copper deposits, or you can’t find any, you’ll need to hop back in your ship and try a different planet.
Once you have enough copper go and mine or farm for the other resources you will need (Carbon, Ferrite Dust, Oxygen.)
Installing the Hyperdrive
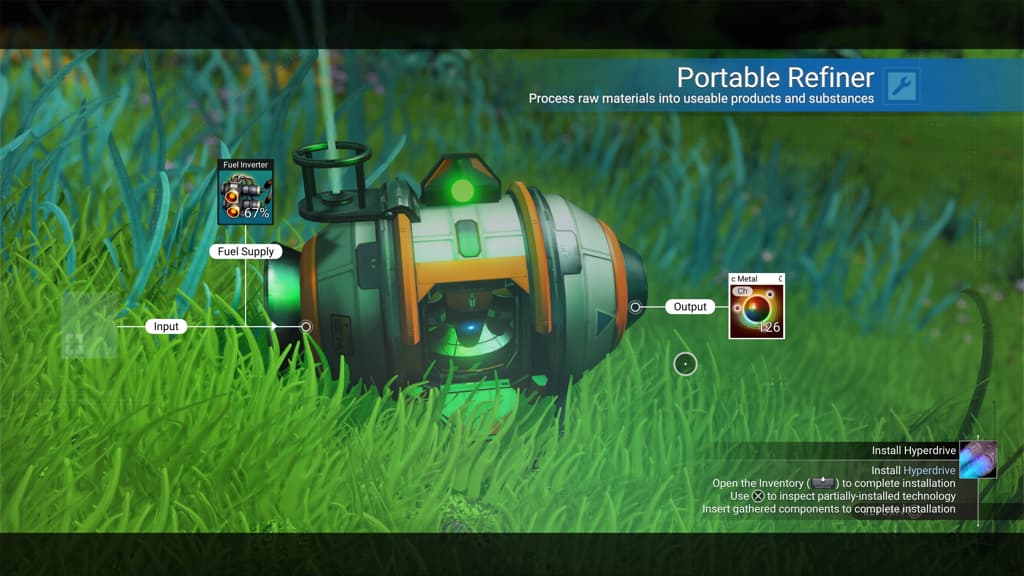
Once you have enough resources, the first thing you need to do is construct the Portable Refiner. Go to your inventory and craft 1 x metal plating. Then exit the inventory and press up on the D-Pad to enter the build menu. Select the portable refiner and place it on the ground.
Interact with it and you will be able to charge it with carbon (or condensed carbon). You can then add copper to the left slot and your refined Chromatic Metal will be available in the right slot after a couple of minutes or so, depending on how much you are refining.
If you have a lot of carbon, you should also put some carbon in the left slot and refine Condensed Carbon as this will be needed in a little bit.
When you have refined enough Chromatic Metal, go into your inventory and craft 5 x Carbon Nanotubes (requires 250 x Carbon). Then craft 5 x Microprocessors.
Now go ahead and click on an empty technology slot on the Starship tab and install the Hyperdrive.
Leaving your current system
Before you can make use of your new Hyperdrive and leave your current star system, there is one more thing you’ll need to do first. Charge the Hyperdrive.
To charge the Hyperdrive you are going to have to craft a Warp Cell. For the Warp Cell, you will need to craft 1 x Anti Matter Housing and 1 x Anti Matter. Here are the resources you need to craft both items.
- Anti-Matter Housing – 30 x Oxygen, 50 x Ferrite Dust
- Anti Matter – 25 x Chromatic Metal, 20 Condensed Carbon.
Once you have those resources, craft both the Anti-Matter Housing and the Anti Matter and then craft the Warp Cell. You can then pick up the Warp Cell in your inventory and drop it onto the Hyperdrive to charge it. Once the warp cell will only charge about 20%, you will need resources to craft about 5 warp cells for a later milestone in phase 1.
Now that you have charged the Hyperdrive you can now leave your current system. But, if you have found yourself in a Gek system you may want to go to the Space Station and talk with some Gek and learn some Gek words for another phase 1 milestone. For more details on this see the milestone ‘Words for Friends.’
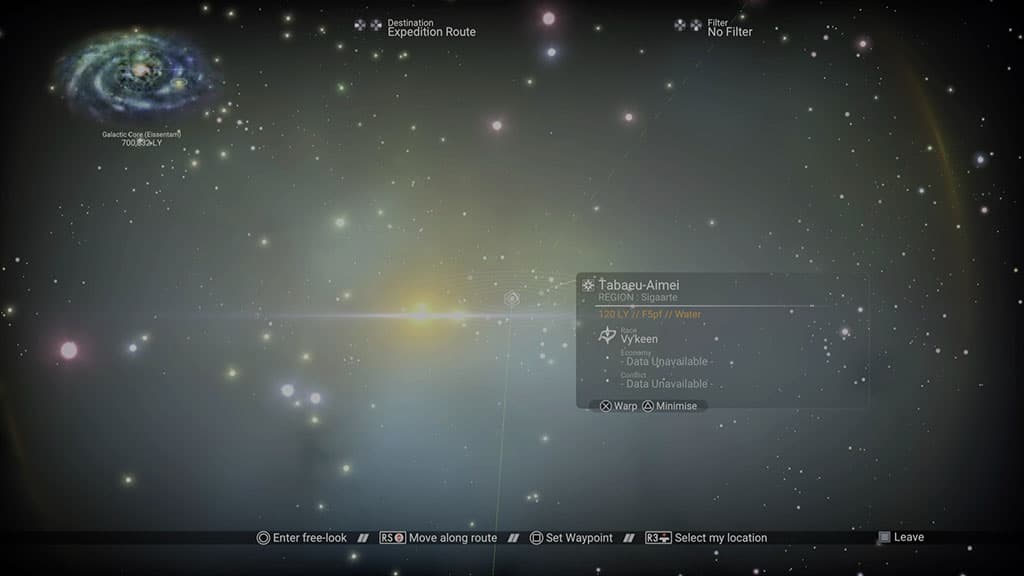
To leave the current system you are in, first, make sure you are in space then open the Galaxy Map by pressing down then right on the D-pad. Open the galaxy map and use the right stick to plot a course to the next point on the expedition route. You can then press X to warp to that System. Upon arriving at the new system the milestone will complete.
Homecoming
Rewards: Decorative Base Parts Set
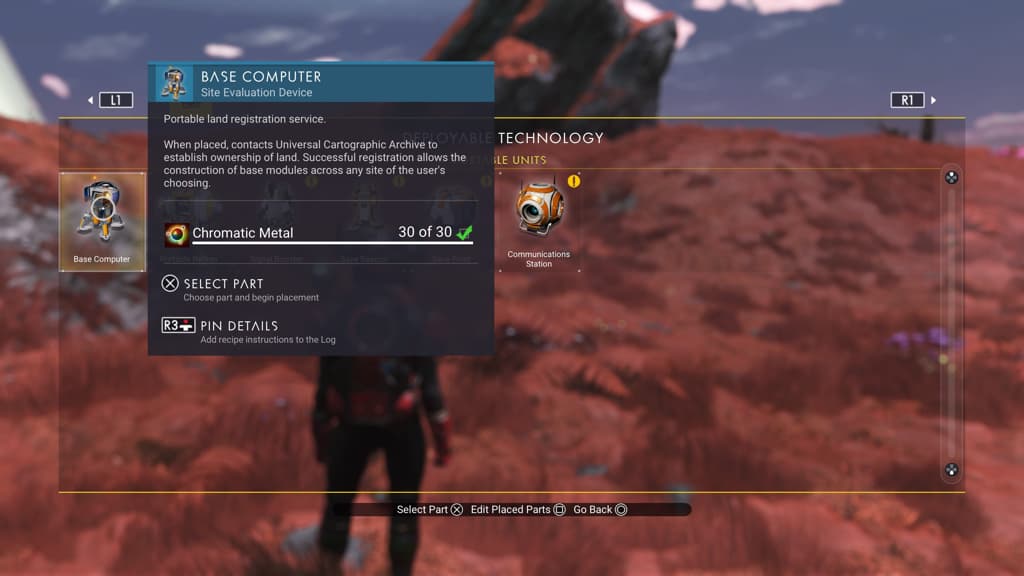
The next milestone is called Homecoming. Homecoming requires you to establish and build your first base. Find a planet you like the look of and fly to it. Find a good place to land and exit your ship. You will need to construct the Base Computer you got as a reward from the previous milestone. The Base Computer requires 30 x Chromatic Metal to build.
Once you have found a suitable place for your base, construct and place the base computer on the ground. Access the build menu (up on the D-pad) to find the Base Computer.
Once you have placed the Base Computer, interact with it and select Claim Base. You can rename the base if you like or take a different base screenshot, but it’s not required for this milestone. The next thing you have to do is expand your base – this means you need to build something on your base, like a small house or something like that.
At this stage in the game, you are limited to wooded parts pretty much. So if you need to go and mine some Carbon now is the time. You might also want to go and mine some more Ferrite Dust from small and medium-sized rocks if you need it.
Once you have enough resources, it’s time to start building something on your base. Access the build menu (up on the D-Pad)and tab right to access Timber Structures.
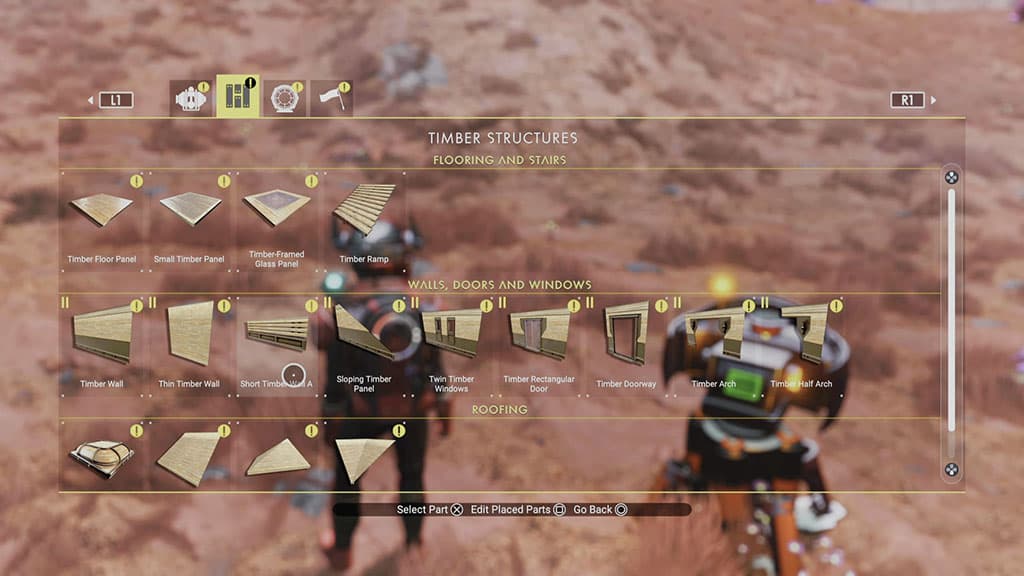
All you have to do to “expand your base” is place 15 parts. So go ahead and place down some wall parts, floor parts, roof parts, etc. It doesn’t;t need to be too fancy but you can use your imagination and build whatever you like. This is how my base looked once I had placed 15 parts.
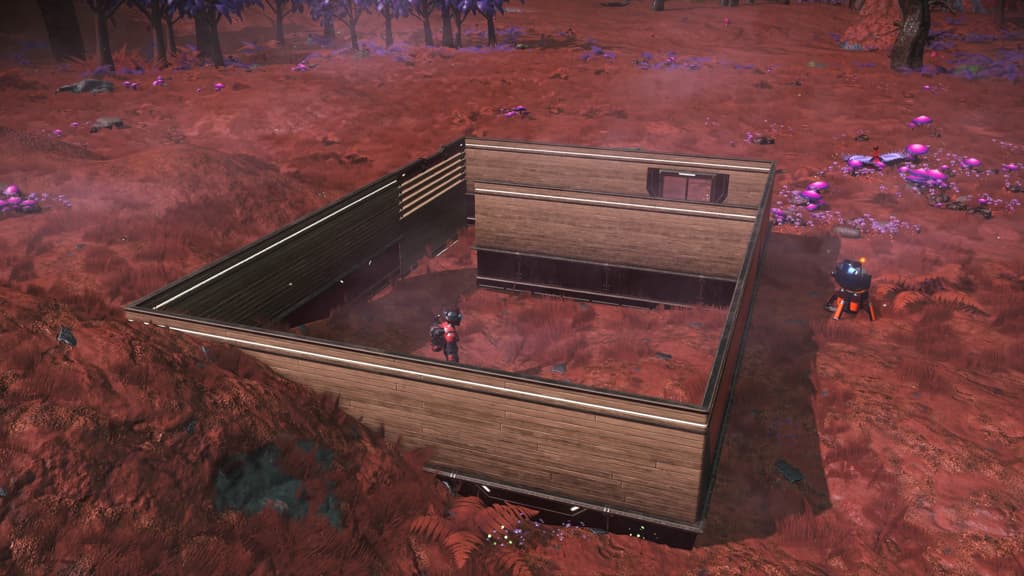
Like I said, it doesn’t; need to be fancy, it just needs to be 15 parts.
Once you have placed 15 base parts the milestone will be completed and you can collect your reward.
If you want to recover your resources, simply interact with the base computer and select Delete Base.
Naturalist
Rewards: Powerful Scanning System Upgrade, Powerful Hazard Protection Upgrade
The next milestone called Naturalist is pretty simple. It just requires you to discover 14 creatures. You may already have completed this if you have been scanning every creature you have come across, or you may still have a few left to discover. So go ahead and scan any creatures you can find.
Undiscovered animals will be shown by a red dot when you look through your visor, so you basically need to discover 14 unique animals. If you can’t find enough animals on your current planet just travel to another until you scan and discover 14.
Once you have discovered 14 animals the milestone will complete.
The Pilgrim
Rewards: Supreme Movement System Upgrade, Powerful Life Support Upgrade.
The Pilgrim is another straightforward milestone but might take a bit of time depending on how much exploring you have done in the previous milestones. The Pilgrim milestone requires you to for 8,000u. Which is not much really. You will probably be close to this already if it isn’t already complete.
If you select this milestone in your log, you will be able to keep track of the distance explored on foot.
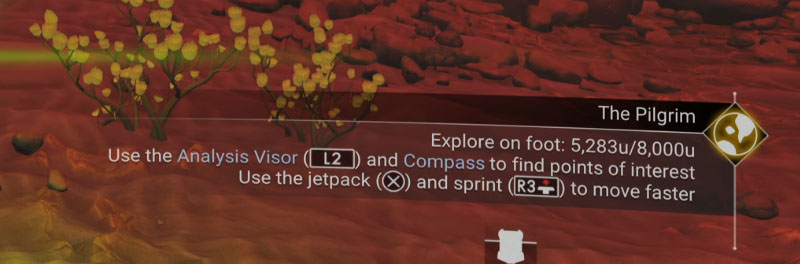
The description says to use the jet pack to move faster. However, I noticed that the distance counter did not increase if I was airborne. So make sure you keep your feet firmly on the ground until you reach 8,000u.
Companionship
Rewards: Bip Bip Buds x 6, Inventory Slot x 3
Companionship is another easy milestone. You simply have to adopt two animal companions. To adopt an animal just go near to any ground-dwelling animal and interact with them when you see the Give Food prompt. Once you have given them a tasty treat (the creature pellets you got as a reward from he first milestone) you can now interact with the animal again.
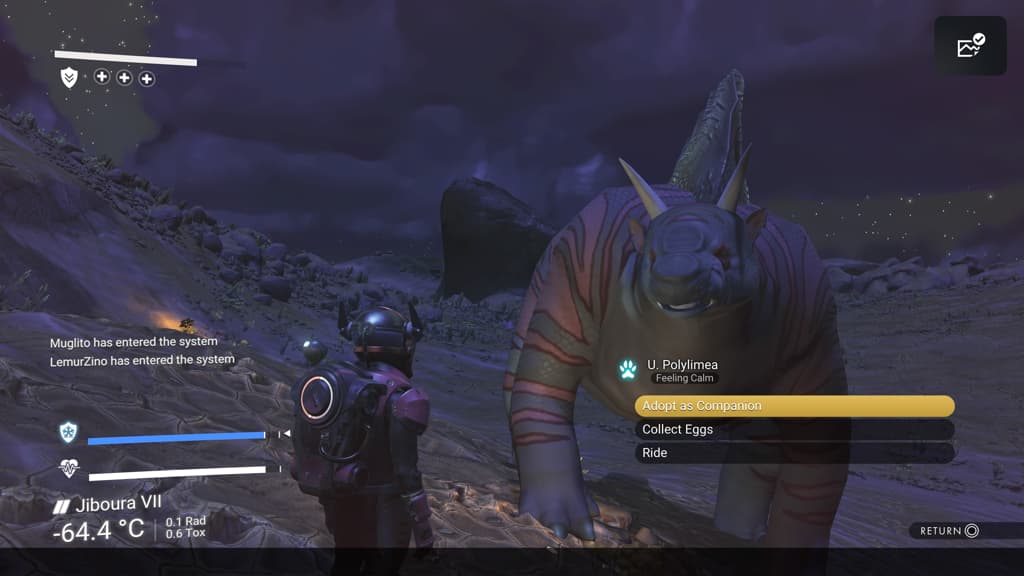
When you interact with the animal the second time (after you give them food) select the Adopt as Companion option and you will adopt yourself a new pet. Now just repeat this process a second time on a different animal to complete the milestone.
Words With Friends
Rewards: De-Scented Bottles x25, First SPawn Relics, 320,000 Units.
Words for Friends is another easy milestone in which you have to learn six Gek words. If you have been to a Gek system previously and visited the space station to talk with some Gek you might have done this already. If not, you will need to access the Galaxy Map and find a Gek system to travel to.
When in the galaxy map you can press Circle to enter free explore mode and then look around for a Gek system. You can select the system by pressing X and then press Triangle to expand the system information. It will show you some details about the System including what the dominant race is.
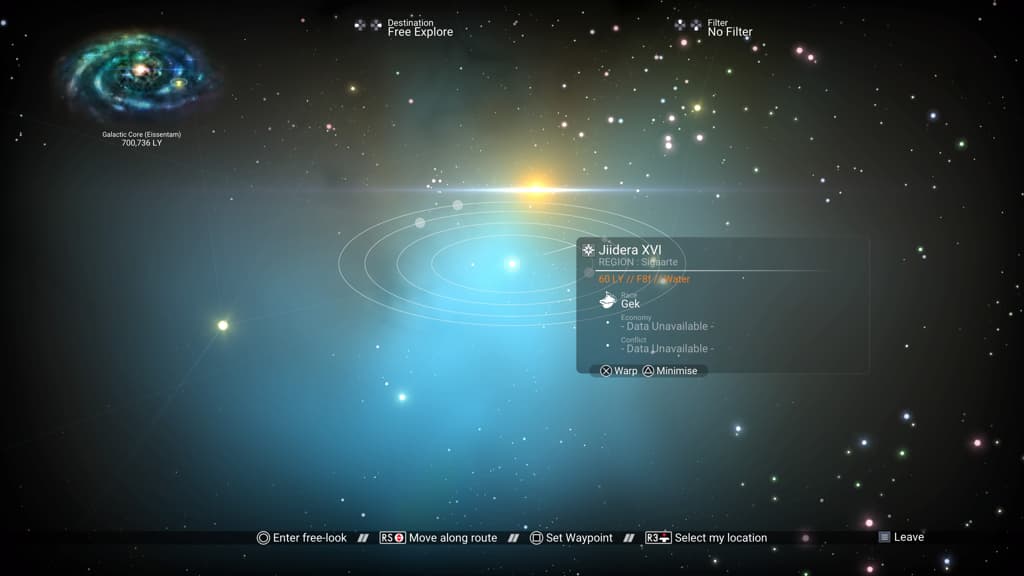
Once you have found a Gek system hold X to warp to it. Just make sure it’s within jump range and yourHeprdrive has enough charge in it.
Once arriving at the Gek system, head to the Space Station and land inside. head up to the right where the mission agents are and interact with some Gek. When you interact with a Gek, select the Request Dialect Help option and then just select any option on the next menu.
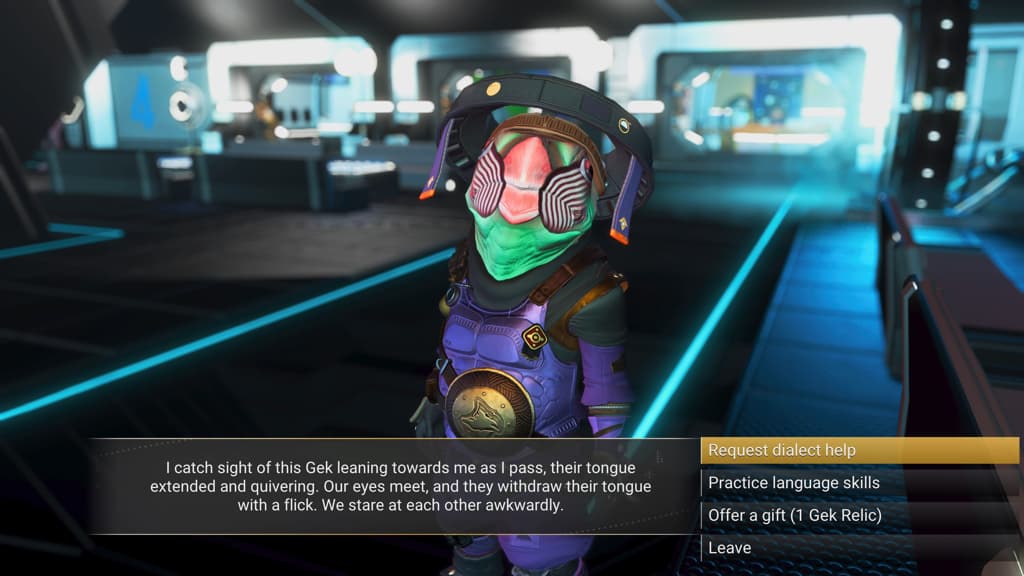
There should be enough Gek on board the space station to learn six words from. If for some reason there aren’t six Gek, fly to any planet in the Gek systems and try finding a Trading Post. These have more Gek you can interact with. Or land on the planet and use your scanner and visor to look for Knowledge Stones, you can also learn words from these.
Once you have learned 6 Gek words the milestone will complete.
Rendezvous 1
Rewards: 1,200 Nanites, Inventory Slot x 3, Multi-Tool Expansion Slot, Storage Augmentation
The final milestone of phase 1 of the Voyager expedition is simply to go to the first rendezvous point. Make sure you have crafted enough Warp Cells, you might need about 4 or 5 to fully charge your Hyperdrive. You’ll have a few jumps to make.
Once your Hyperdrive is charged, access the GalaxyMap and use the right stick to move to the next point on the expedition route. Warp to the system then just repeat this step until you are at the final system.
Once you arrive at the final system in the route, look for the Rendezvous 1 mission icon and follow it.
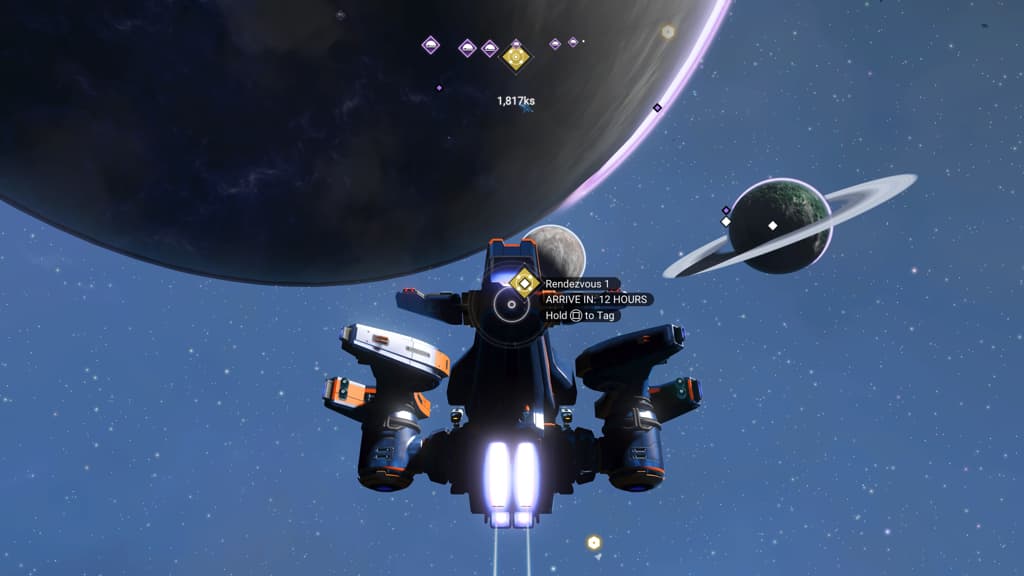
You will eventually reach the surface of a planet but you will only be at the approximate location of Rendezvous 1. Before you land, fly around a bit and look for a large structure with a tower and some landing pads, Rendezvous 1 will be in there. This will save you some walking about on the planet’s surface.
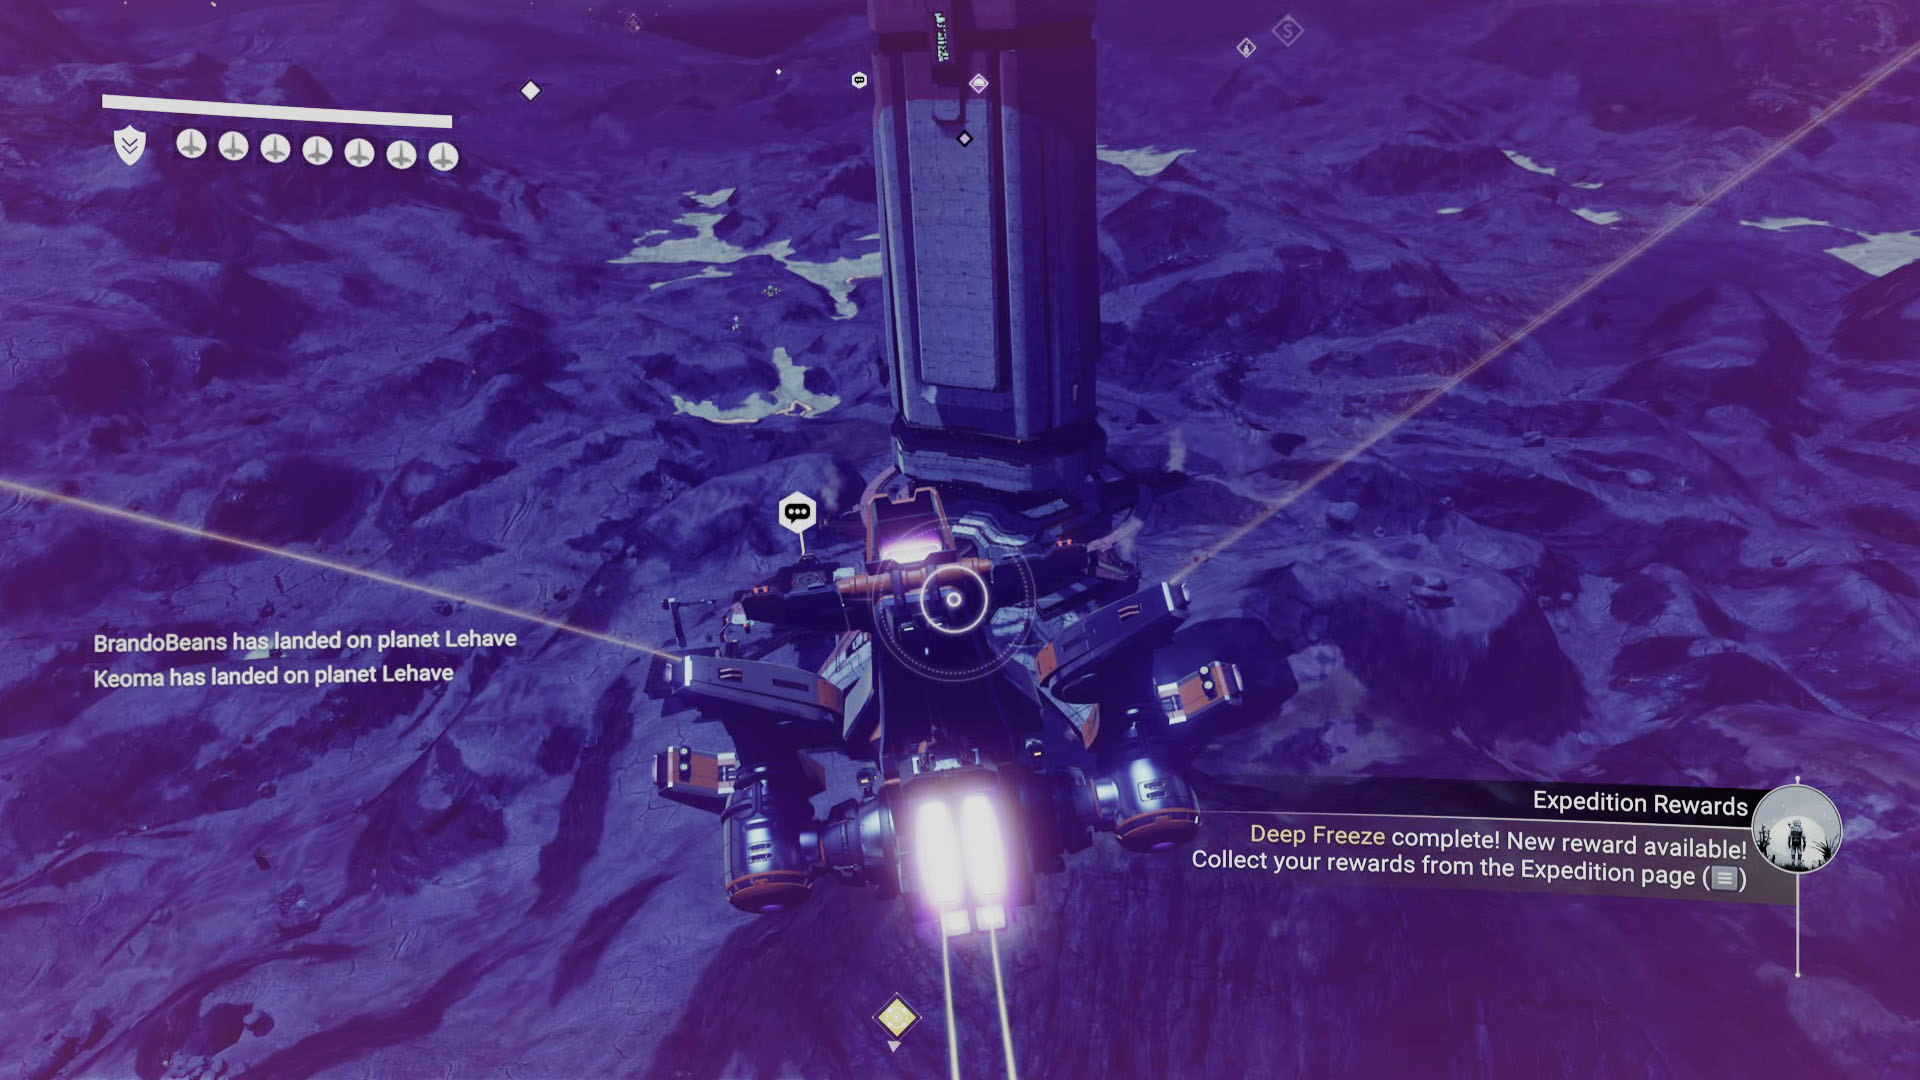
Land on or reach this structure, ensuring that this is indeed the correct place. Once you get into the structure a certain distance the milestone will complete. Make sure to collect your reward and then it is on to phase 2 of the Voyager Expedition.